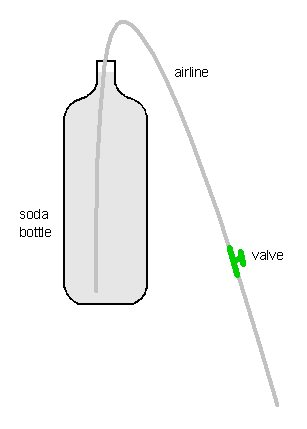
Figure 1: The setup of the Kalkwasser dripping.
Dripping Kalkwasser is an excellent method to maintain calcium and alkalinity in tanks with a medium calcium/alkalinity demand. The following is a very simple and inexpensive method to drip Kalkwasser into an aquarium.
Standard airline tubing can be used and you will need either a plastic airline valve or clamp to restrict the flow of the Kalkwasser. Only use plastic valves as metal ones may corrode and leach copper or other metals into the water. Place the valve around the middle of the airline. The valve can instead be placed on the outlet or the airline and have the Kalkwasser directly drip from it.
Calcium hydroxide can be the more expensive aquarium brands such as Seachem or you can use cheaper substitutes such as builder's lime (AKA hydrated lime) or pickling lime. While the cheaper alternatives may not be as pure, the high pH of the Kalkwasser causes most if not all impurities to precipitate out of solution as soon as the Kalkwasser is mixed.
A small plastic funnel is required to pour the water and calcium hydroxide into the bottle.
It is best to mix the Kalkwasser a few hours to a day before it is to be used. The longer the mixed Kalkwasser is left, the more suspended matter will settle to the bottom of the bottle resulting in a clearer solution. Mixed Kalkwasser stored in a seal bottle will last for a number of days (and even longer) without loss of potency.
Kalkwasser is best made using RO, DI or RO/DI water. This will reduce any unknown impurities being added to the tank.
The amount of calcium hydroxide required will depend on the size of the bottle. If I use "more pure" calcium hydroxide (e.g. Seachem Kalkwasser), I use a slightly heaped teaspoon to 2L of water. If I am using builder's lime, I use 1 very heaped teaspoon to 2L of water. The extra is added a) because it is cheap and b) to ensure the solution is truly saturated as this will maximise the precipitation of impurities.
Kalkwasser is best dripped at night after the lights out. At this time the pH of the water is generally lower due to the higher carbon dioxide concentration in the water from the decrease in utilisation of carbon dioxide by photosynthetic organisms. The Kalkwasser will help raise the pH and there will be more carbon dioxide to interact with the hydroxide to produce bicarbonate and carbonate. Dripping Kalkwasser during the day in a tank with a lot of corals and/or algae can really push the pH of the water up due to the very low concentration of carbon dioxide in the water,
Kalkwasser should be dripped into an area of the tank or sump where there is a lot of water movement. The higher water movement will ensure good mixing of the Kalkwasser and lower the local concentration of calcium and hydroxide which can lead to precipitation of calcium carbonate. If the tank has a sump with a relatively fast sump return, the Kalkwasser is best dripped into the intake of the pump. If the tank does not have a sump, the Kalkwasser should be dripped into the intake or in front of the outlet of one of the surface powerheads.
Once you have chosen the location where the Kalkwasser will be dripped, you need to find a place to put the bottle. The bottom of the bottle needs to be higher than the water level to ensure the Kalkwasser will still siphon to within 2cm of the bottom of the bottle. If you are dripping into the sump an upturned bucket can serve as a shelf for the bottle. If you are dripping directly into the tank the centre brace may be high enough but normally you'll need to raise it higher to ensure a consistent flow.
Avoid sucking any of the precipitate into the airline while dripping. Any precipitate may block the valve and may cause pH problems if it makes it into the tank. If you are using builder's lime, the precipitate will include impurities which you do not want in the tank.
To start the drip going:
Figure 1: The setup of the Kalkwasser dripping.
If the flow is adjusted correctly, the dripping should take 2-5 hours to complete.
It may be necessary to clean the airline and valve with vinegar every week or two.
Note: The open bottle will generally not result in any significant precipitation of calcium carbonate from carbon dioxide in the air. Normal air is only around 0.03% carbon dioxide and the amount moving into solution and diffusing through the Kalkwasser will be insignificant.
For more information on Kalkwasser, see:
Last updated: April 25, 2003